We haven't done much painting this year due to our switchover to the rigorous Common Core curriculum. The paint bottles have been sitting on the shelf above the cubbies calling to me. I have been waiting all year for this opportunity.
Throughout the year, we have read a number of Eric Carle picture books, and one of the children's favorite snack time videos is a collection of Eric Carle stories that includes The Very Hungry Caterpillar; Papa, Please Get the Moon for Me; and The Very Quiet Cricket. So they are quite familiar with his work. (And I love the calming nature of the video.)
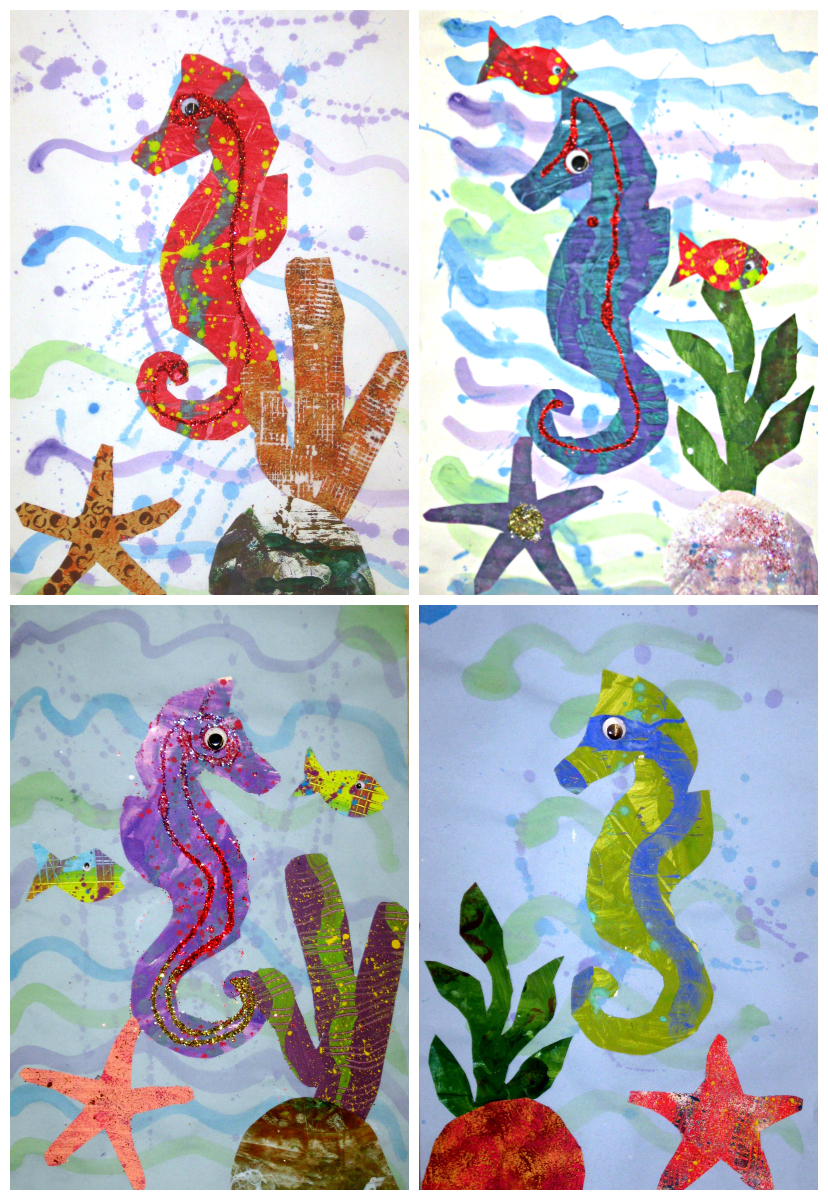
Toward the beginning of our ocean life unit, I read Mister Seahorse to the children. This book features aquatic fathers that take a primary role in carrying for or protecting the eggs and babies. Seahorse fathers, rather than mothers, are the ones who become pregnant and give birth. So this is also a Father's Day tie-in, and we create the seahorse collages as Father's Day gifts. (Father's Day can be a tricky celebration to acknowledge in the classroom since some children do not have a father present in their lives. In such cases, I encourage children to give their collage to an important male figure in their life or whomever they choose.)
Click HERE for a video of the Mister Seahorse story being read aloud.
We also watch a fabulous video, Eric Carle: Picture Writer, in which Eric Carle talks about early influences (including his kindergarten teacher) that nurtured his interest in art. He also reads from some of his books and demonstrates his process of creating collages in his studio.
Here is the complete list of supplies I have on hand for the project. You can definitely improvise; not everything is essential!
Materials:
- Two sheets of white 12"x18" construction paper (per child)
- Watercolor paint (blue, green, purple)
- Smaller and larger paintbrushes
- Paint cups
- Several different colors of tempera paint
- Scrapers (or a plastic fork)
- Textured "stamps" (i.e. backings from carpet samples, bubble wrap, anything with a textured pattern)
- Sea sponges
- An old toothbrush (for splatter painting)
- Patterned sponge rollers and/or matchbox cars
- Plastic trays (for applying paint to the sponge rollers; I use the large rectangular lids from store-bought salad mixes)
- Newspapers or some kind of protective covering for tables
- Scissors
- Glue sticks
- Glitter glue, or glitter and Elmer's glue, or metallic paint pens
- Black Sharpie marker
- Smock
- Wiggly eyes
- Hot glue gun or tacky glue
- Poster board or cardstock (to make tracers)
Procedure:
Each child needs two white sheets of 12"x18" construction paper for the seahorse project. (I have considered using a paper size that is easier to frame but haven't done it since all my tracers are sized for 12"x18", and the size really seems to "work.") The first paper will become the ocean background, and the second paper will become "pretty paper" for the seahorse. Note: If you are doing this at home with one or two children, you will want to make a few sheets of "pretty paper" for the project; one won't be enough.
1. Create the Ocean Background
I start by having each child write his/her name in pencil on what will be the back side of one sheet of white paper. Then they turn it to the front and paint squiggly "waves" all the way across using the blue, green, and purple watercolors. After making the lines, they can splatter-paint or let their wet paintbrush drip color onto the paper to suggest "bubbles." Set aside to dry.

This step goes quickly, and I did it with one child at a time. I was fortunate this year to have one student who volunteered (without being asked) to be the cleanup person. He was ready with a wet paper towel (see top photo) to clean up any paint that got on the table surface. (I didn't put down newspaper.) Another student took it upon herself to be the teaching assistant. She explained directions to her classmates and showed them examples of the ocean backgrounds in the Mister Seahorse book. I had the next child write his/her name on the paper and sit at the table watching the child who was painting, to see how to do it.
2. Create the Pretty Collage Paper
This step takes at least two days to complete. On the first day, children paint their second sheet of white paper the color of their choosing (after writing their names on the back in pencil). For this, I like to mix tempera paint to make interesting colors, like tangerine, indigo, turquoise, chartreuse, fuchsia, dandelion, terracotta, etc. Then I dilute the paint with water so it covers the paper more easily and lasts longer.
One year, I asked children to choose a color ahead of time and grouped them together according to the colors they chose so they could all paint at the same time. That worked well (as long as you have enough paintbrushes and space). Other years, I've set up a table during play centers time and worked with two children at a time, allowing them to select from a variety of mixed colors.
The children cover their entire paper with one color of paint. They use the thickest paintbrushes I have, to make it go faster. We let the papers dry overnight.

The next day is the messiest but also the most fun. Children need to wear smocks for this! I set aside one table as the painting table and put out numerous cups of mixed, diluted tempera paints, paintbrushes, plastic trays, textured stamps, kid-sized sponge rollers, sea sponges, etc.


Then I call one or two children at a time and guide them to:
- Paint or roll lines or dots across their paper (straight, zigzag, or squiggly) using a contrasting color.
- Use a patterned scraper, plastic fork, or the handle end of a paintbrush to scrape through the painted lines, to create texture and color variations.
- Use a sea sponge and/or patterned stamp to add even more texture.

Finally, I take the children outdoors to finish their papers by splatter-painting a contrasting color on top. They can use either a paintbrush or a toothbrush for this. If using a paintbrush, they flick the paintbrush (held several inches above the paper) to propel the paint from the brush to the paper. If using a toothbrush, they hold the toothbrush above the paper with one hand and rub the opposite thumb along the bristles to propel the paint to the paper.

Let the "pretty papers" dry.
3. Trace and Cut the Seahorse
I made tracers from poster board in the following shapes: seahorse, coral and/or seaweed, rock, starfish, and tiny fish. You can do a Google Images search for the shapes, print them out, and trace them on poster board or cardstock, etc. to make the tracers.
I trace the shapes on the back of the "pretty papers" because children have a tendency to put the tracer smack dab in the middle of a paper. (They do this with cookie cutters and dough, as well.) I like to save the scraps for others to use in their collages, and there are more (and larger) scraps left over if I trace the shapes strategically close to the edge of the paper. I also write the child's name in pencil in the middle of the seahorse shape.
The pretty paper each child painted will be the paper used for his/her seahorse, which is the largest element of the collage. I give each child his/her paper with the seahorse shape traced on the back. The children cut out their seahorses, and I save each child's seahorse in a separate ziplock bag that will be used to store the rest of his/her collage pieces. I have them put their scraps on a table.
4. Trace and Cut the Other Shapes
I sort the paper scraps into piles according to whether they would make good coral, seaweed, rocks, starfish, or tiny fish. Then I trace the shapes on the back of the scrap papers. Hopefully I can trace a few of the same shape on the scrap paper. Then I cut around the traced shapes to make smaller pieces of pretty paper that the children can cut into the shapes. I put all of the paper with coral tracings on the back into one ziplock bag, all of the seaweed tracings in another, etc.
Then I have the children select the papers they want to use for the rest of their collage pieces. I've found that this works best as a small group activity, and I definitely recommend having another adult in the room to help manage this step.
I did this during our work stations time. Some children read independently to themselves and others used the computers, while a third group selected their collage papers. I set up piles of the different pretty papers (with a certain traced shape on the back) on a table, and an adult volunteer supervised the children as they selected a paper for each object in the collage. For instance, one pile contains paper scraps with a starfish traced on the back, another pile has paper scraps with rocks traced on the back, etc. The children put their collage papers into their plastic bag along with the seahorse they cut out previously. (Note: I let the children choose either a seaweed or a coral paper, but not both.)
Then this group of children goes to a table, writes their name inside the traced shapes, and cuts out all the shapes, saving the scraps in a bin (that will be dumped into the "scrap paper" drawer of our art center paper organizer for future use) and putting their cut-out shapes into their plastic ziplock bag.
5. Assembling the Collage
Meanwhile, I have been setting up a table for them to assemble their collages. I put each child's ocean background paper on the table along with lots of glue sticks and some Sharpie markers. I talk the children through the process of assembling their collages in the following order:
- First, they glue and place their coral or seaweed toward a bottom corner of the paper. (The paper should be oriented so that it is tall, rather than wide.)
- Next, they glue and place their rock in front of (and slightly overlapping) the coral or seaweed.
- Next, they glue and place their starfish in the opposite bottom corner (on the ocean floor).
- Next, they glue and place their seahorse somewhere in the center of the page.
- Finally, they glue and place their two small fish anywhere they want.
They finish by signing their name in black Sharpie. They also could draw tiny circles on the starfish and coral to create a more textured look.

6. Applying the Finishing Touches
I use a hot glue gun to affix a wiggly eye to the children's seahorses and a very small wiggly eye to their tiny fish. (You could instead use a hole punch, white paper, and a black marker to create eyes.)
An optional final step is to allow them to accent their collages with glitter glue, metallic (gold or silver) paint pens, or glitter and glue. The children LOVE this step, so I always try to make time to include it.

They are so proud of the art they have created!

---------------------------
© Susan Meyer and River Bliss, 2012-2013. Unauthorized use and/or duplication of this material, including all photos, without express and written permission from this blog’s author/owner is strictly prohibited. Excerpts and links may be used, provided that full and clear credit is given to Susan Meyer and River Bliss (www.riverblissed.blogspot.com) with appropriate and specific direction to the original content.
No comments:
Post a Comment